
What does one do when a large, clustered environment, say 15 or more front-end application servers, starts to choke up an NFS server, or your nodes are reading stale data due to the NFS protocol limitations? What should you do when gigabit Ethernet no longer provides sufficient throughput on your back end storage infrastructure to deliver your files to the world wide web? You implement GFS2.
If you want to know more about the difference between these two filesystems, you can read the comparison here
I recently set up a small test environment to muck around with GFS, and the result turned out fairly decent and didn't take a whole lot of time, either.
I'm assuming that if you are reading my blog, technology interests you, and you have heard of GFS2 or the Red Hat Clustering Suite before. But what is it? How does it work? I'll try to explain a bit about it here.
GFS2 operates on block devices, not virtual "export" directories or "shares", like CIFS or NFS do. So how is that going to help us achieve a shared file system among all of our web servers if it operates on block devices? There are many answers to that question, only one of which I have explored so far. You can attach block storage to remote systems in a number of different ways, to name a few:
- iSCSI - Probably the easiest, certainly the least expensive.
- ATAoE - Similar to the above, however, ATA-over-Ethernet is exactly that, where iSCSI is Internet SCSI over TCP/IP.
- Fibre Channel - Probably the best-performing option, and probably the most expensive
At work, I will most likely be using Ethernet exclusively, so I naturally chose iSCSI as my transport. iSCSI will enable me to export a block device on my shared storage for use on multiple remote systems. Let's explore how that is done, as without shared block storage, GFS2 isn't going to do much for us.
Defining an iSCSI target
Firstly, we need to designate our iSCSI target, or in other words, the storage target that the application servers will be accessing. In this example I will be using just one iSCSI target, which I intend to later have serving my "vhosts" directory for web data. Let's call our iSCSI target system 'storage1'. It is going to need software for creating iSCSI targets, so let's go ahead and install the package "scsi-target-utils":
# /usr/bin/yum -y install scsi-target-utils
This package contains some useful commands that we will use to create the iSCSI target. Namely, "tgtadm". Before we can use any of them though, we need to start up the targeting service:
# service tgtd start
Starting SCSI target daemon:                               [  OK  ]
Now let's attempt to create a new target. For simplicity's sake, I will be naming this particular target "vhosts". In other examples that I have read through, a rather long string was used as the target name. Using a short name like I am here may have its downside, but other than being easily identifiable I am not sure at this point what the significance is. Fire away:
# tgtadm --lld iscsi --op new --mode target --tid 1 -T vhosts
This creates a new iSCSI target with an ID of "1" and the name "vhosts". You can display tgtd's current configuration using the following command:
# tgtadm --lld iscsi --op show --mode target
Target 1: vhosts
    System information:
        Driver: iscsi
        State: ready
    I_T nexus information:
        I_T nexus: 1
            Initiator: iqn.1994-05.com.redhat:d72ea8b8c1bc
            Connection: 0
                IP Address: 66.226.72.129
        I_T nexus: 2
            Initiator: iqn.1994-05.com.redhat:22c2e6a28041
            Connection: 0
                IP Address: 127.0.0.1
    LUN information:
        LUN: 0
            Type: controller
            SCSI ID: IET     00010000
            SCSI SN: beaf10
            Size: 0 MB
            Online: Yes
            Removable media: No
            Backing store type: rdwr
            Backing store path: None
        LUN: 1
            Type: disk
            SCSI ID: IET     00010001
            SCSI SN: beaf11
            Size: 4294 MB
            Online: Yes
            Removable media: No
            Backing store type: rdwr
            Backing store path: /dev/hdd1
    Account information:
    ACL information:
        ALL
So there we have our target. Now what is it going to use for storage? Of course, a block device! If you have additional space on your drive that is un-partitioned, you can create a new partition there and use that, or alternatively, and likely a much better idea, you can add another block device, which could be an extra hard drive, or ideally, a RAID array.
Here we add the block device to the configuration:
# tgtadm --lld iscsi --op new --mode logicalunit --tid 1 --lun 1 -b /dev/hdd1
My testing was on a virtual machine, so /dev/hdd1 was a simple 4GB virtual disk. Now that we have our target created and attached to block storage, we need to allow accessibility from our nodes. The following command is most likely not suited for enterprise deployments and the like, but for my testing purposes it worked just fine. This will export the device to all iSCSI connections:
# tgtadm --lld iscsi --op bind --mode target --tid 1 -I ALL
As soon as you run that command, you may notice port 3260 open up and start listening. "tgtd" is doing this:
# netstat -lnp | grep tgtd
tcp        0      0 0.0.0.0:3260                0.0.0.0:*                   LISTEN      3160/tgtd
tcp        0      0 :::3260                     :::*                        LISTEN      3160/tgtd
unix  2      [ ACC ]     STREAM     LISTENING     18251  3160/tgtd           /tmp/.TGT_IPC_ABSTRACT_NAMESPACE
You may be able to limit access to your iSCSI targets by simply writing some stateless iptables rules for port 3260, but this I also have not tested. I'll include details on that in a later follow-up post. For now, let's disable iptables altogether, since this is a test after all.
# service iptables stop
Our iSCSI target should now be configured and ready for use. For now, we will leave iSCSI as it is. We will connect the clients later on, as they will not be able to do anything with the block storage at this point without GFS2.
Setting up master clustering software
In this example, I am using a single server for both the iSCSI target as well as the cluster administration server. Thus, I will be installing the Red Hat Cluster Suite on the 'storage1' server.
# yum -y groupinstall "Clustering"
# yum -y groupinstall "Cluster Storage"
We will leave that installed for now, and come back to it after the clients are ready to accept connections from the cluster administration web interface (Luci).
Preparing the clients
We now need to get some software installed on the clients, or application servers, to talk to the newly-created iSCSI target, and eventually the GFS2 filesystem. Let's plan for two clients, named 'web1' and 'web2'. On both systems, we need to install the clustering suite, and the iscsi initiator:
# yum -y groupinstall "Clustering"
# yum -y groupinstall "Cluster Storage"
# yum -y install iscsi-initiator-utils
The "Clustering" group will include the "luci" and "ricci" daemons along with other stuff, and the "Cluster Storage" group will contain the GFS2 file system and related utilities.
Connecting the clients to iSCSI
Let's now take a minute to connect the client machines to the exported iSCSI device on 'storage1'. On both 'web1' and 'web2', we need to do the following:
# service iscsi start
# iscsiadm -m discovery -t sendtargets -p [ip address of iSCSI target server]
# service iscsi restart
You should see the iSCSI daemon discover the device that we configured with "tgtadm" earlier. It will appear as the next sequential SCSI device. If you are using an IDE drive for the root device, and have no other drives installed, this will likely be "sda". If you have one SCSI or SATA disk already, then it will likely display as "sdb". If you have two disks, it will be "sdc", so on and so forth, you get it. Regardless of the device on the remote target system, the disk will show up as a raw device unless you partition it over iSCSI. In my example, I partitioned a secondary 4GB disk and exported that with "tgtadm". On the target system, "storage1", the device is known as /dev/hdd1, named by a block device and a partition number. Once discovered by my clients, the partition came up as "/dev/sda", no partition specification. This is fine, because you can mount a block device that has no partition table in the same manner as something that does have a partition table.
Now that you see the device, let's start up the clustering software so that we can configure it from the cluster administrator server. Again this being a test, I am turning iptables off in lieu of boring you with iptables rule setup. On both 'web1' and 'web2':
# service iptables stop
# service ricci start
# chkconfig ricci on
# service cman start
# chkconfig cman on
As any good RHCE or Red Hat enthusiast should know, after running a command such as "chkconfig [service] on", you should check to ensure what run levels it is set to boot at:
# chkconfig --list ricci
ricci           0:off   1:off   2:on    3:on    4:on    5:on    6:off
# chkconfig --list cman
cman            0:off   1:off   2:on    3:on    4:on    5:on    6:off
The default run levels defined by "on" are defined by whoever authored the init script. Never trust anyone, just check for yourself.
Configuring the clustering software
If you have not tested GFS2 before, you will like this part. There is a web interface that comes with Luci that you can use to configure your cluster. Firstly, let's set up the admin user and start up the clustering administrator software on "software1":
# luci_admin init
# service luci start
# chkconfig luci on
At this point you may notice TCP/8084 open up, listening via stunnel:
# netstat -lnp | grep 8084
tcp        0      0 0.0.0.0:8084                0.0.0.0:*                   LISTEN      2231/stunnel
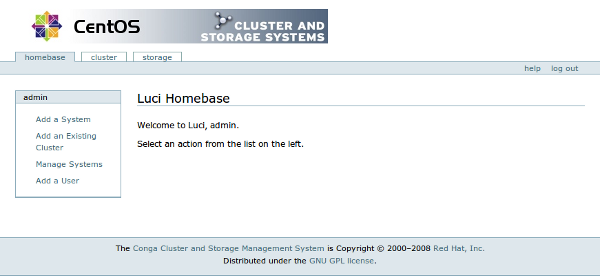
You should now be able to connect via https:// directly to the ip address of the cluster administrator server on port :8084. The interface itself is fairly simple. You will find your way around it in no time. Log in with the user name and password you configured during the "luci_init" command and you will be presented with a screen like this:
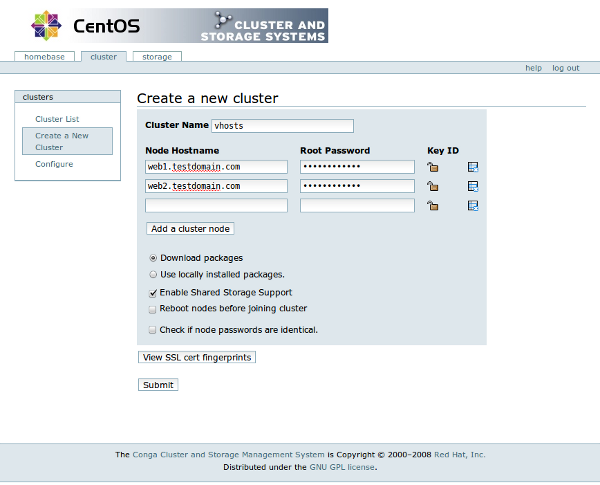
You will then configure a cluster by clicking on "Create a new cluster" and filling in the information like so:
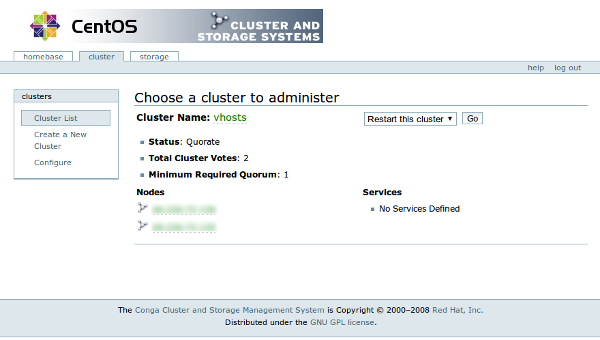
When you have successfully created your cluster, it should look something like this:
I am not spending a whole lot of time on the web interface, because it is so simple, and if you know what a cluster is and how to managed a Linksys router, you will find your way around and be able to figure this part out.
Creating the GFS2 filesystem and mounting it on the clients
Now that we have a cluster all set up, let's make the filesystem and get it mounted. On "storage1", or the cluster administrator server, do the following:
# mkfs.gfs2 /dev/[real block device name]
And then on each client ("web1" and "web2" in this case), enter the following into /etc/fstab, obviously changing the mount point to your liking:
/dev/sda /var/www/vhosts gfs2 acl 0 0
I've entered "/dev/sda", because the emulated hard drives on my virtual machine are identified as ATA devices, or /dev/hdX. Thus, the iSCSI drive is the first SCSI device, so it is called "sda". "sda" is actually mapped to "/dev/hdd1" on the "storage1" server. Assuming that the "/var/www/vhosts" directory exists, we can now mount this drive after GFS is started:
# service gfs2 start
# chkconfig gfs2 on
# mount /var/www/vhosts
If those commands succeed, you will probably be able to see something like this, read from /etc/mtab:
/dev/sda on /var/www/vhosts type gfs2 (rw,hostdata=jid=0:id=327682:first=1,acl)
Quick tests and other thoughts
Now that you have the GFS2 file system from the exported iSCSI target mounted on both "web1" and "web2", try reading / writing a few files to and from it, and examine the result on the opposite application server. My own personal testing has thus far not been extensive, as I have been toying more with configuration standardization up to this point. I have not seen any actual issues, but I have not put the filesystem under load just yet.
In my extended thoughts, when pitted against a setup quote, it really only makes sense to implement something like GFS if the traffic to the shared filesystem is going to be great, or if there will be many, many clients (application servers) accessing the same data at the same time. Or both. For most setups, where it is not absolutely imperative that the latest copy of a file is read every time it is updated no matter what, NFS will likely still prove to be the best candidate in turnaround time and cost of support.
In conclusion to my first post and endeavor with GFS2, I believe that both NFS and GFS2 have their particular places and practical uses in clustering environments. I personally would not use a mixture of the two, unless there is an unforseen advantage to doing things that way, but don't forget about your NFS roots just yet.